
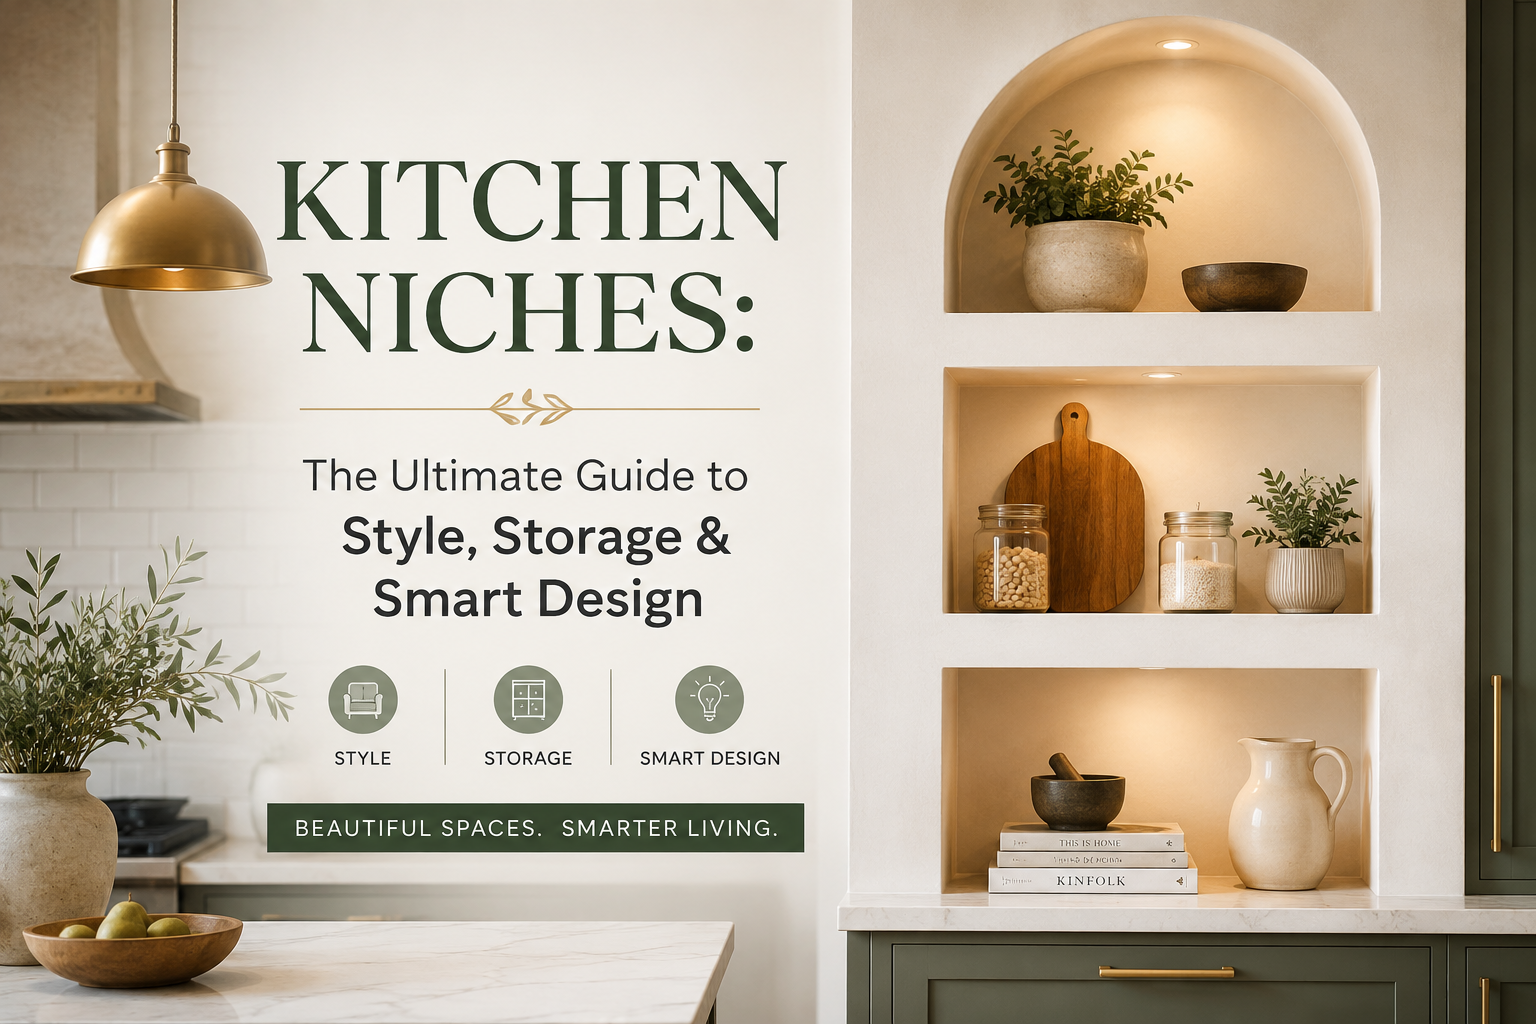

A well-placed kitchen niche can transform a plain wall into a statement. Here’s everything you need to know — from types and placement to materials, lighting, and the mistakes to avoid.
Home Décor · 8 min read
In the world of kitchen design, niches — also called recessed alcoves or wall cutouts — have gone from a builder’s afterthought to one of the most sought-after features in modern and traditional kitchens alike. Whether you’re building from scratch or renovating an existing space, a thoughtfully designed kitchen niche adds personality, practical storage, and architectural depth that no shelf or cabinet can quite replicate.
But what exactly is a kitchen niche? At its simplest, it’s a recessed opening carved into a wall — typically between wall studs — to create a shallow, built-in storage or display area. It can be tiled, painted, lit from within, lined with mirrored glass, or fitted with wood. The possibilities are vast, and the design decisions you make will determine whether your niche becomes a stunning focal point or a missed opportunity.
This guide covers everything: the different types of kitchen niches, where to place them for maximum impact, which materials work best, how lighting can make or break the look, and the key mistakes to avoid before you pick up a sledgehammer.

What Is a Kitchen Niche — And Why Does It Matter?
The term “niche” comes from the French word for “nest,” and that’s exactly what a good kitchen niche feels like — a cozy, intentional pocket carved out of an otherwise flat surface. In practical terms, a kitchen niche is a recessed box built into the wall, usually between 3.5 and 6 inches deep (the width of standard wall studs), though deeper niches can be created in thicker walls or exterior-facing partitions with proper insulation work.
Unlike a floating shelf bolted onto a wall, a niche is flush with the wall plane. This creates a sleek, architectural look that adds dimension without consuming any floor or counter space — a critical advantage in smaller kitchens. It’s storage that disappears into the wall itself.
Beyond function, a kitchen niche is a design statement. A boldly tiled niche behind the stove signals craftsmanship. A niche filled with herbs under a warm Edison bulb signals warmth. A matte black niche with minimalist ceramics signals contemporary restraint. Whatever your kitchen’s personality, there’s a niche style to match — and amplify — it.
“A kitchen niche is the rare design element that gives back more than it takes — adding storage, depth, and character without consuming a single square foot of floor space.”
Types of Kitchen Niches
Not all kitchen niches are alike. Choosing the right type depends on your kitchen’s layout, your wall structure, and what you want the niche to do.
1. Backsplash Niche (Range Niche)
The most common type, a backsplash niche is positioned directly above the stove or range. It’s typically tiled to coordinate with or contrast the surrounding backsplash, and it holds frequently used items like oils, spices, salt, and utensils. This placement makes practical sense — your most-reached-for cooking essentials are inches from where you actually cook. Dimensions typically range from 24 to 36 inches wide and 6 to 12 inches tall, though taller designs with multiple horizontal shelves are increasingly popular.
2. Open Wall Niche (Display / Storage)
Positioned on any open kitchen wall — often near the dining area or along an island wall — this type of niche functions more like a built-in display case. It’s ideal for cookbooks, small plants, candles, decorative ceramics, or a wine bottle collection. It can run from a single rectangular opening to an architectural arrangement of multiple niches at varying heights, creating a gallery-like effect.
3. Under-Cabinet Niche
A clever solution for kitchens with upper cabinets that don’t reach the countertop all the way, an under-cabinet niche creates a recessed ledge or box just above the counter surface. It’s perfect for a tablet stand, a charging station, or a slim row of spice jars — and it keeps the counter itself visually cleaner.
4. Window Seat or Pass-Through Niche
In open-plan homes or kitchens adjacent to a dining room, a pass-through niche in the dividing wall serves both aesthetic and functional roles. It can hold wine glasses, act as a serving shelf, or simply frame the connection between two spaces with an architectural flourish.
Choosing the Right Location
Placement is everything. Before cutting into a wall, you need to consider structural load, plumbing, electrical wiring, and the visual flow of the room.
Behind the stove is the classic choice — high visibility, high utility. Above the sink is another popular option, though you’ll need to waterproof the interior carefully. An end wall of an island offers a dramatic, architecturally bold placement that feels custom and intentional. A niche on the breakfast nook wall adds warmth and character to a casual dining corner.
Always check for wiring and plumbing before committing to a location. Hire a licensed contractor or at minimum have an electrician trace the wall before any demo work. Cutting into the wrong spot can turn a weekend project into a very expensive repair.
✦ Pro Placement Tips
- Check for electrical wiring and plumbing before cutting — use a stud finder and outlet tracer.
- Standard interior walls allow 3.5″ depth (between studs). Exterior walls need insulation consideration.
- Position niches at eye level for display, or counter-height for active cooking use.
- Align niche width with nearby cabinetry or window proportions for a cohesive look.
- Leave at least one stud on each side intact to maintain structural integrity.
Materials and Finishes: Making the Niche Sing
The interior of a niche is a small canvas — and what you put on it matters enormously. The most popular choice is tile, and for good reason: it’s durable, easy to clean, heat-resistant (important near a stove), and available in countless styles. A bold patterned tile inside an otherwise neutral niche creates an instant focal point. A classic white subway tile interior blends seamlessly with a matching backsplash.
Zellige tiles — handmade Moroccan clay tiles with a slightly irregular, reflective surface — have become one of the most popular niche choices in contemporary kitchen design for their texture and artisan quality. Marble slabs offer a luxurious, seamless look, especially when book-matched to an island countertop. Painted plaster or limewash creates a soft, organic look ideal for Mediterranean or cottagecore aesthetics.
For a warmer, more rustic feel, wood-lined niches (using sealed hardwood or moisture-resistant wood veneers) bring an unexpected natural warmth — though they require careful sealing and should not be placed directly behind a stove. Painted drywall in a contrasting color is the most budget-friendly option and works beautifully in a matte or satin finish.

Lighting Your Kitchen Niche
Lighting is the secret weapon of a great kitchen niche. Even the most beautiful tile looks flat without it. The right lighting transforms a niche from a storage pocket into a glowing architectural feature.
LED strip lighting along the interior edges or top of the niche is the most versatile option — thin, dimmable, and available in a spectrum of color temperatures from warm amber (2700K) to cool white (4000K). For a kitchen niche near the stove, warm tones complement food and cooking; for a display niche with ceramics or plants, a slightly cooler tone brings out texture and color.
Recessed puck lights set into the top of a deeper niche create a gallery-lighting effect, casting downward pools of light on displayed objects. Backlit panels — a thin LED panel behind frosted glass or alabaster — create a soft, diffused glow perfect for a dramatic feature wall niche. If you’re going for a maximalist, jewel-box look, mirrored interiors with integrated LED strips multiply the light and depth exponentially.
Always use IP-rated (waterproof) lighting inside niches near the sink, and make sure all electrical work near the stove is compliant with local codes. When in doubt, hire an electrician — the visual payoff is absolutely worth the investment.
✦ ✦ ✦
Common Mistakes to Avoid
Kitchen niches are one of those features that look effortless when done right — but the planning stage is where most homeowners trip up. Here are the most common mistakes and how to sidestep them.
Making It Too Small
A niche that’s too narrow or too shallow ends up looking pinched and afterthought-ish. A minimum width of 18 inches gives you room to display items meaningfully. If the space allows, go wider — 24 to 36 inches is the sweet spot for most kitchens.
Ignoring the Waterproofing
Any niche near water — above the sink, near the dishwasher, or in a humid kitchen — needs to be properly waterproofed before tiling. Skipping this step leads to moisture infiltration, mold, and eventual structural damage. Use a membrane waterproofing system and seal all grout lines.
Choosing Style Over Practicality
A stove-side niche lined with rough-textured stone looks gorgeous but is nearly impossible to clean. Always balance aesthetics with the realities of where your niche will live. Smooth, sealed tile surfaces near the range; durable, sealed finishes everywhere else.
Forgetting About Proportion
A niche should relate to the rest of the kitchen in scale. A giant niche in a small kitchen overwhelms the space; a tiny niche in a grand open-plan kitchen gets lost. Use the proportions of nearby windows, cabinetry, or appliances as a reference guide.

Styling Your Kitchen Niche
Once the niche is built and finished, the fun begins: styling it. The key principle here is intentional curation over cluttered filling. A niche that’s stuffed to capacity loses its architectural impact entirely.
For a range niche, keep it strictly functional: a small olive oil cruet, a salt cellar, one bundle of fresh herbs in a bud vase, and a few frequently used spices. Resist the urge to add more. The negative space is part of the design.
For a display niche, think in layers: one larger object (a ceramic vase, a stack of cookbooks), one medium object (a small plant, a candle), and one small accent (a piece of pottery, a wooden utensil). Vary heights using small risers or books, and leave at least 30% of the niche visually “empty.”
Change the styling seasonally — it’s one of the easiest and most impactful ways to refresh your kitchen’s look without touching a single tile or cabinet.
Budget Considerations
The cost of a kitchen niche varies widely. A simple painted drywall niche with no electrical work can be done as a DIY project for a few hundred dollars in materials. A fully tiled, lit, professionally installed niche typically runs between $500 and $2,000, depending on tile selection, labor costs in your area, and whether any electrical or waterproofing work is required.
The biggest cost drivers are the tile material (handmade or imported tiles like zellige or encaustic cement tile can run $20–$60 per square foot), integrated lighting (budget $150–$400 for a quality LED strip or recessed light system), and professional labor if you’re not handy with drywall and tile. Even at the higher end, a kitchen niche offers exceptional return on investment — it’s a feature that photographs beautifully, adds perceived value, and elevates the entire kitchen’s design IQ.
Final Thoughts
A kitchen niche is one of the most rewarding design investments you can make in a kitchen renovation or build. It costs less than a new appliance, takes up zero floor space, and delivers outsized impact in both function and aesthetics. Whether you’re drawn to a sleek, monochromatic range niche in a contemporary kitchen or a warm, wood-lined display alcove in a farmhouse-style space, the fundamentals are the same: plan carefully, choose materials that suit the location, light it beautifully, and curate it with restraint.
Done right, a kitchen niche doesn’t just hold your olive oil. It holds the entire character of your kitchen — and becomes one of those details guests notice, compliment, and never quite forget.
Enjoyed this article? Share it with a friend who’s renovating their kitchen — or save it for when the time comes.